Run Pytorch model
What we are going to do
In previous tutorials, we used TensorFlow Lite(TFLite) models. However, there's another, rather more popular machine learning framework which Optimium supports - PyTorch. In this tutorial, we will run Optimium with a PyTorch model. To keep thing simple, we will not use the remote setting in this tutorial.
Requirements
We assume that you have installed Optimium and the Optimium Runtime on your PC. If you have not, we highly recommend you visit Optimium Setup
The process here is divided into two steps: 1. Optimize, and 2. Deploy & test.
1. Optimize
Before you start
1️⃣ Set the environmental variable
The environment variable WORKING_DIR must be set before importing Optimium.
WORKING_DIR is the path where Optimium-related logs and outputs are created.
cd <any workspace you may want>
export WORKING_DIR=$PWD
2️⃣ Create a user argument file template
To fully optimize your model for your target hardware, you need to provide hardware information.
Don't worry; you can simply follow the prompts (see detailed steps here)
First, run Python and enter the following commands:
import optimium
optimium.create_args_template()
Once you have followed all the prompted instructions, user_arguments.json will be created in your WORKING_DIR.
Note: In this guide, for better accessibility, please select the following options:
- Press "no" when prompted with "Is your target device remotely connected?"

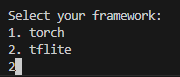
- Press "1" when prompted with "Select your framework"
- Press "yes" when prompted with "Enable hardware-specific auto-tuning?"
3️⃣ Modify model information
Next, you need to update your model information as guided here. You should modify "input_shapes".
input_shapes: This tutorial takes only one input with shape[1, 28, 28, 1]
Modify the model information ("input_shapes") in user_arguments.json, as below.
{
  	...
    "model": {
        "input_shapes": [
            [1, 28, 28, 1]
        ],
        "framework": "pytorch",
        ...
    },
    ...
}
4️⃣ Set your license key information
Optimium requires a license. If you have not received a license, please check your mail or contact us. To set the license, you can save the license key into user_arguments.json under the key "lincense_key".
# user_arguments.json
{
    "license_key": "AAAAA-BBBBB-CCCCC-DDDDD",
    "device_name": "MyDevice",
    "model": {
 				...
		},
 		...
}
Run Optimium
In your workspace, run python3 and execute the following lines. Optimium takes a PyTorch model that inherits torch.nn.Module. For this tutorial, we will create a model with a single convolutional layer.
Then this step will optimize and compile the provided model.
import optimium
import torch

class SampleModel(torch.nn.Module):
  def __init__(self):
    super(SampleModel, self).__init__()
    self.conv = torch.nn.Conv2d(1, 1, 3, 1, 1, bias=False)
  def forward(self, tns: torch.Tensor):
    return self.conv(tns)

model = SampleModel()
optimium.optimize_pytorch_model(model, x, max_trials=64)
Check output
The above step saves the result in $WORKING_DIR/outputs/. The nested directory name depends on "device_name", "opt_log_key", and "out_dirname" in user_arguments.json.
You should get two files like the example below:

2. Deploy & test
We will run the optimized PyTorch model using the Optimium Runtime Python API.
Update the output directory in your code by replacing /path/to/your/optimium/output/directory at line 3 with your actual output directory.
In this tutorial, we use random input. The Optimium Runtime Python API takes a NumPy array and thus we create a random NumPy array as input.
import optimium.runtime as rt
import torch

# Load runtime model
ctx = rt.Context()
model = ctx.load_model("/path/to/your/optimium/output")
# (example) model = ctx.load_model("/workspace/outputs/MyDevice-num_thread_1-MyOptKey/MyOutputDir")
req = model.create_request()

# Prepare input image
inputs = {
  model.input_tensors_info[0].name : np.random.random((1, 28, 28, 1)).astype(np.float32)
}
req.set_inputs(inputs)
req.infer()
req.wait()
output = req.get_outputs()
In this tutorial, we focused on optimizing a PyTorch model with Optimium. Deploying the optimized model in real environments like Raspberry Pi 5 or Android devices is described in previous tutorials: Run pose detection in Linux RPi5 with C++, Run face detection in Android with Kotlin. Using these guides, you should now be able to deploy your PyTorch model.
Modern CPUs support multi-threading for parallelization/concurrent execution, which easily accelerates the execution of codes including AI inference. As Optimium supports multi-threading execution, we will explore how to run AI models with multiple threads in our next tutorial. Let's get started: Run AI model with multiple threads.
Updated 6 months ago