Run pose model on Linux w/ C++
What we are going to do
In this tutorial, we will run a pose detection AI model on Raspberry Pi 5 using C++ under single-thread. We will optimize the AI model using the remote setting explained in the previous tutorial Set up target device in remote setting.
Requirements
- Rasperry Pi 5 as the target device (This tutorial is suitable for the RPi 5, but you may substitute to your own Linux device).
- SSH should be set up on the target device
This tutorial process is composed of three steps: 1. Launch Remote Server, 2. Optimize, and 3. Deploy & test.
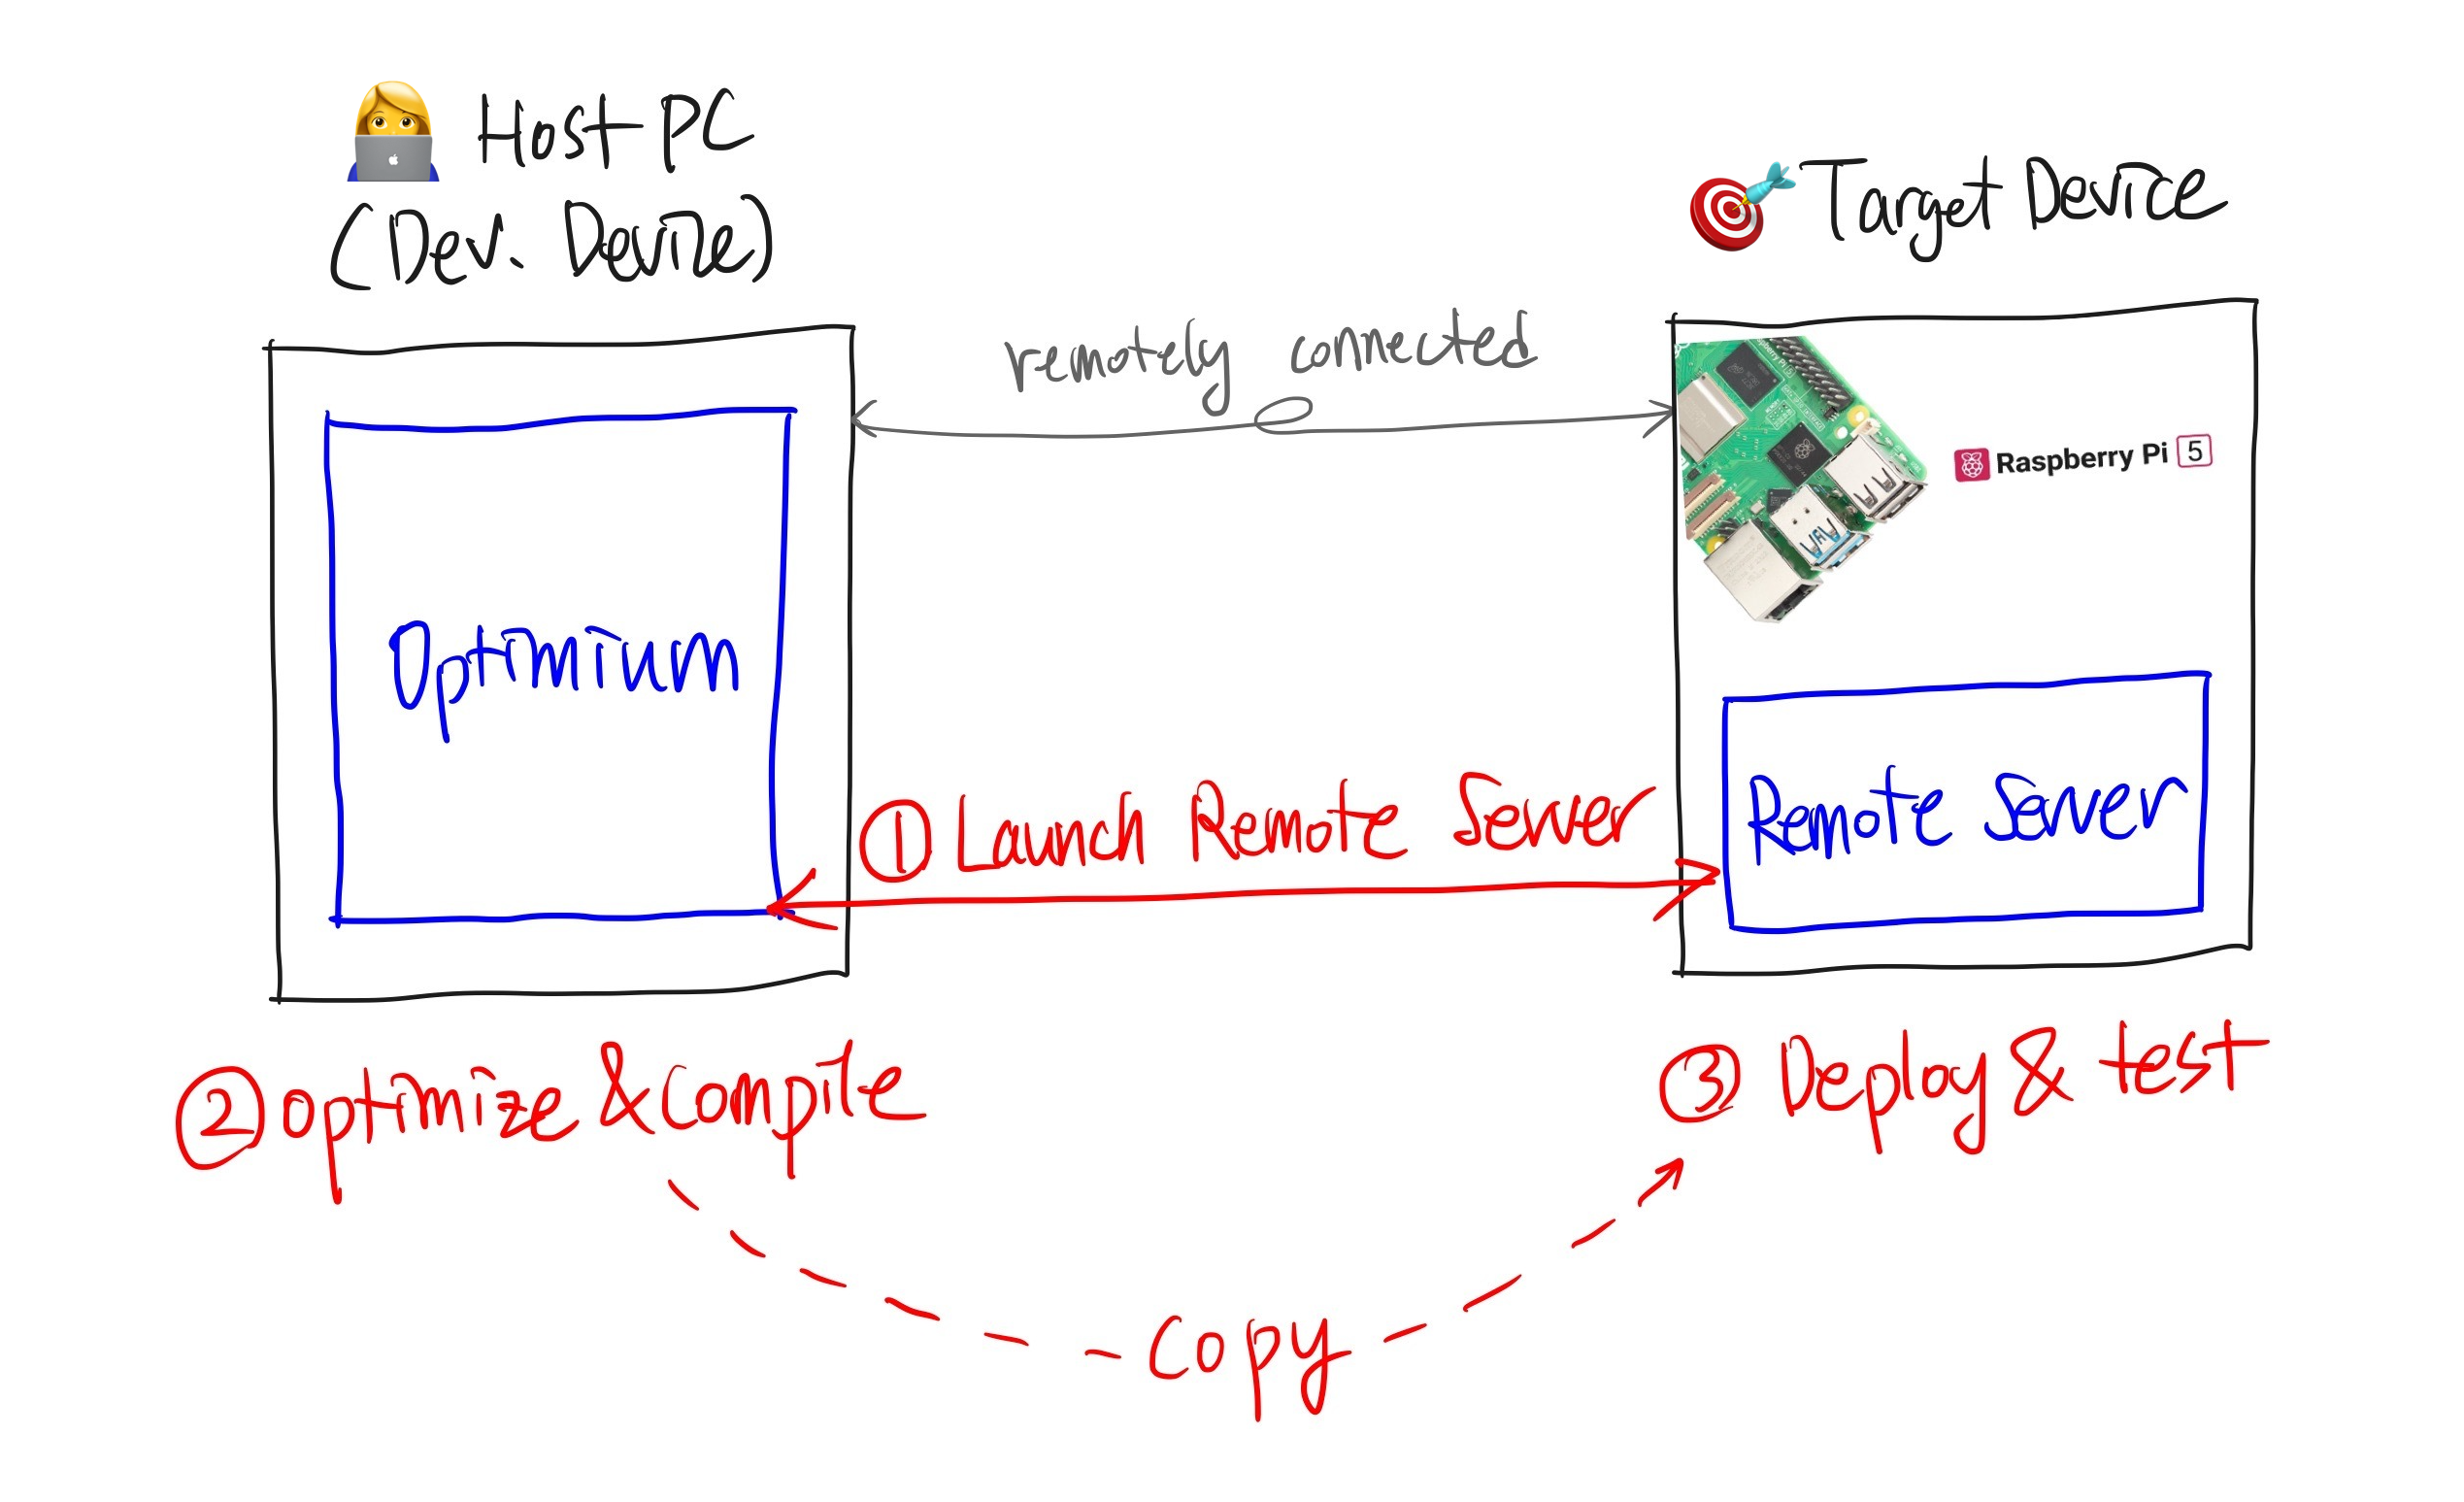
1. Launch Remote Server
We assume that you have set up the remote setting on your target device. If not, please check the previous tutorial Set up target device in remote setting.
Once you have installed the Optimium Remote Server, you can launch it as follows. The Optimium Remote Server uses port 32264 as the default listening port. You can change it by using the --port PORT option. You need to remember this <port> and <ip address> for the next step.
# assume that you uses port number 32264
optimium-remote-server --port 32264
2. Optimize
Before you start
1️⃣ Download the model and image files
Prep: Download the pose detection model here, and the sample image here.
You need the TFLite model and image files. We will use the pose estimation model published by Google MediaPipe project. Get pose_landmark_lite.tflite and sample_image.jpg and save them wherever you want.
2️⃣ Set the environmental variable
The environment variable WORKING_DIR must be set before importing Optimium.
WORKING_DIR is the path where Optimium-related logs and outputs are created.
cd <any workspace you may want>
export WORKING_DIR=$PWD
3️⃣ Create a user argument file template
To fully optimize your model for your target hardware, you need to provide hardware information.
Don't worry; you can simply follow the prompts (see detailed steps here)
First, run Python and enter the following commands:
import optimium
optimium.create_args_template()
Once you have followed all the prompted instructions, user_arguments.json will be created in your WORKING_DIR.
Note: In this guide, for better accessibility, please select the following options:
- Press "yes" when prompted with "Is your target device remotely connected?"
- Enter the<IP address of the target device> when prompted "Specify remote IP address of your remote device."
- Enter the<port of the remote server> when prompted with "Specify remote port of your remote device, press ENTER to skip (default: 32264)"
- Select "ARM64" when prompted "Select architecture of target device" (because the RPi5 is an ARM64 device. If your device is not RPi5, select the appropriate architecture for your target device.)
- Press "2" when prompted with "Select your framework"
- Press "yes" when prompted with "Enable hardware-specific auto-tuning?"
4️⃣ Modify model information
Next, you need to update your model information as guided here. You should modify "model_path" and "input_shapes".
model_path: The relative path to where you savedpose_landmark_lite.tflitein your workspace directory. (In fact, this is the relative path toWORKING_DIR, which was set to your workspace directory in step 2.)input_shapes: This model has one input with shape[1, 256, 256, 3]
Modify the model information ("input_shapes" and "model_path") in user_arguments.json, as below.
{
  	...
    "model": {
        "input_shapes": [
            [1, 256, 256, 3]
        ],
        "framework": "tflite",
        "tflite": {
            "fp16": false,
            "model_path": "[relative path to pose_landmark_lite.tflite]"
        }
    },
    ...
}
5️⃣ Set your license key information
Optimium requires a license. If you have not received a license, please check your mail or contact us. To set the license, you can save the license key into user_arguments.json under the key "lincense_key".
`# user_arguments.json
{
    "license_key": "AAAAA-BBBBB-CCCCC-DDDDD",
    "device_name": "MyDevice",
    "model": {
 				...
		},
 		...
}
Run Optimium
In your workspace, run python3 and execute the following lines. This step optimizes and compiles the provided model.
import optimium

optimium.optimize_tflite_model(max_trials=128)Optimium dynamically searches and tunes inference performance to fit the target hardware. This process may take a considerable time depending on your machine. We are actively working to accelerate the process!
Setting a lower value for
max_trialsmay help you get the result faster, but it might not fully optimize the model. For this example,max_trials=128will be sufficient.
Check output
The above step saves the result in $WORKING_DIR/outputs/. The nested directory name depends on "device_name", "opt_log_key", and "out_dirname" in user_arguments.json.
You should get two files like the example below:

3. Deploy & test
Install Optimium Runtime
If you installed the Optimium Remote Server in Set up target device in remote setting on your target device, you can skip this step because the Optimium Runtime C++ is installed together while installing Optimium Remote Server.
1️⃣ Get Optimium Runtime.
In the Optimium SDK you downloaded (see Optimium Setup), you will find the Optimium Runtime prepared for various architectures and operating systems in tar.gzformat (OPTIMIUM_SDK/runtime/cpp/archives/optimium-runtime-<version>-<os>-<arch>.tar.gz).
Copy this into your working directory.
cp Optimium_SDK/runtime/cpp/archives/optimium-runtime-<version>-<os>-<arch>.tar.gz optimium-runtime.tar.gz2️⃣ Unzip the archive.
You can install the Optimium Runtime in any directory you prefer. In this tutorial, we assume the runtime is installed at $HOME/.local.
mkdir -p $HOME/.local
tar xzf optimium-runtime.tar.gz -C $HOME/.local
3️⃣ Configure your environment.
Configure your PATH environment variable to ensure the Optimium Runtime operates properly.
export PATH="$PATH:$HOME/.local/bin"Setup environment
We will run the optimized model using C++, so you'll need build tools.
sudo apt install build-essential cmake libopencv-devThen create a project directory.
mkdir optm_ex // you may change a name as you want
cd optm_ex
Copy the output into your target device
Now it's time to run the optimized model on Raspberry Pi 5.
We need to copy the output from the host device to the target device. The output is saved under $WORKING_DIR/outputs as described above. You need to copy the directory itself (e.g., MyOutputDir in the above example) into a project directory.
Here's an example command using an SSH copy:
scp -r <host device id>@<host device ip>:<your Optimium workspace>/outputs/MyDevice-num_thread_1-MyOptKey/MyOutputDir \
  <target device id>@<target device ip>:/home/<target device id>/optm_ex
Create a CMakeLists.txt
Create a CMakeLists.txt file and copy the following code into it.
We assume you have already installed the Optimium Runtime Remote Server on the target device as described in Set up target device in remote setting. This will automatically install the Optimium Runtime for C++ in $HOME/.local. If not, please check Optimium Runtime c++ with manual installation
cmake_minimum_required(VERSION 3.21)

project(Optimium-Cpp LANGUAGES CXX)

find_package(OpenCV REQUIRED COMPONENTS core highgui videoio imgproc)
find_package(Optimium-Runtime REQUIRED HINTS "$ENV{HOME}/.local")

add_executable(optimium-cpp main.cpp)
target_link_libraries(optimium-cpp PRIVATE Optimium::Runtime opencv_core opencv_imgproc opencv_highgui opencv_videoio)
set_target_properties(optimium-cpp PROPERTIES
                      CXX_STANDARD 17)
Optimium Runtime requires C++17 to compile correctly. For that, set
CXX_STANDARDto17(line 11) for your cmake target. Orset(CMAKE_CXX_STANDARD 17)to set C++ language version globally.
Create a main.cpp
Create a main.cpp file and copy the following code into it.
Modify the following lines:
- Line #96: Replace
"sample_image.jpg"with the path to where you saved the image file. - Line #105: Replace
"MyOutputDir"with the directory where you saved the Optimium outputs.
#include <Optimium/Runtime.h>

#include <opencv2/core.hpp>
#include <opencv2/imgproc.hpp>
#include <opencv2/imgcodecs.hpp>
#include <opencv2/highgui.hpp>
#include <opencv2/videoio.hpp>

#include <filesystem>
#include <iostream>
#include <cmath>

namespace fs = std::filesystem;
namespace rt = optimium::runtime;

using timer = std::chrono::high_resolution_clock;

constexpr size_t kNumLandmarks = 39;
const static std::array<cv::Point, 35> Vertexes = {
    cv::Point{0, 1},
    cv::Point{1, 2},
    cv::Point{2, 3},
    cv::Point{3, 7},
    cv::Point{0, 4},
    cv::Point{4, 5},
    cv::Point{5, 6},
    cv::Point{6, 8},
    cv::Point{9, 10},
    cv::Point{11, 12},
    cv::Point{11, 13},
    cv::Point{13, 15},
    cv::Point{15, 17},
    cv::Point{17, 19},
    cv::Point{19, 15},
    cv::Point{15, 21},
    cv::Point{12, 14},
    cv::Point{14, 16},
    cv::Point{16, 18},
    cv::Point{16, 22},
    cv::Point{18, 20},
    cv::Point{20, 16},
    cv::Point{12, 24},
    cv::Point{11, 23},
    cv::Point{24, 23},
    cv::Point{24, 26},
    cv::Point{26, 28},
    cv::Point{28, 32},
    cv::Point{28, 30},
    cv::Point{32, 30},
    cv::Point{23, 25},
    cv::Point{25, 27},
    cv::Point{27, 29},
    cv::Point{27, 31},
    cv::Point{29, 31}
};

struct Landmark {
    float X;
    float Y;
    float Z;
    float Visibility;
    float Presense;

    cv::Point to_point() const {
        return cv::Point(static_cast<int>(X), static_cast<int>(Y));
    }
};

float sigmoid(float x) {
    return (1.0f / (1.0f + std::exp(-x)));
}

constexpr float kWidth = 640.0f;
constexpr float kHeight = 480.0f;

void decode_landmarks(const size_t num_values, const float* raw_data, std::vector<Landmark>& landmarks) {
    const auto num_dimensions = num_values / kNumLandmarks;

    for (auto i = 0; i < kNumLandmarks; ++i) {
        Landmark landmark;
        const float* base = raw_data + (i * num_dimensions);

        landmark.X = (base[0] / 256.0f) * kWidth;
        landmark.Y = (base[1] / 256.0f) * kHeight;

        landmarks.push_back(landmark);
    }
}

rt::Result<void> do_main() {

    cv::Mat resized(cv::Size2i(256, 256), CV_8UC3);
    cv::Mat transformed(cv::Size2i(256, 256), CV_8UC3);

    std::string imagepath = "sample_image.jpg";
    cv::Mat frame = cv::imread(imagePath, cv::IMREAD_COLOR);

    if (image.empty()){
      return rt::Error(rt::Status::InitFailure, "failed to read image");
    }

    rt::Context context = TRY(rt::Context::create());
    rt::Model model = TRY(context.loadModel("MyOutputDir")); // change MyOutputDir by your directory
    rt::TensorInfo output_tensor_info = TRY(model.getOutputTensorInfo("Identity"));
    size_t output_size_0 = output_tensor_info.TensorShape.getTotalElementCount();

    rt::InferRequest req = TRY(model.createRequest());
    rt::Tensor input_tensor = TRY(req.getInputTensor("input_1"));

    std::vector<Landmark> landmarks(kNumLandmarks);

    cv::resize(frame, resized, resized.size());
    auto resize_end = timer::now();

    cv::cvtColor(resized, transformed, cv::COLOR_BGR2RGB);
    auto color_end = timer::now();

    {
      rt::BufferHolder input_buffer = input_tensor.getRawBuffer();
      float *raw = input_buffer.cast<float>();
      cv::Mat input(256, 256, CV_32FC3, raw);
      transformed.convertTo(input, CV_32FC3, 1.0f / 255.0f, 0);
    }
    auto type_end = timer::now();

    CHECK(req.infer());
    CHECK(req.wait());
    auto infer_end = timer::now();

    {
      rt::Tensor output_tensor_0 = TRY(req.getOutputTensor("Identity"));
      rt::BufferHolder output_buffer = output_tensor_0.getRawBuffer();

      float *raw = output_buffer.cast<float>();
      decode_landmarks(output_size_0, raw, landmarks);
    }
    auto decode_end = timer::now();

    for (const auto [start, end] : Vertexes) {
      const auto& start_landmark = landmarks[start];
      const auto& end_landmark = landmarks[end];

      cv::line(frame, start_landmark.to_point(), end_landmark.to_point(),
               CV_RGB(255, 0, 0), 3);
    }

    for (const auto& landmark : landmarks) {
      cv::circle(frame, landmark.to_point(), 7, CV_RGB(0, 0, 255), -1);
    }

    cv::imshow("image", frame);
    auto show_end = timer::now();

    landmarks.clear();

    // std::cout << "read: " << ((read_end - begin).count() / 1000.0f)
    //           << "us, resize: " << ((resize_end - read_end).count() / 1000.0f)
    //           << "us, cvtColor: " << ((color_end - resize_end).count() / 1000.0f)
    //           << "us, cvtType: " << ((type_end - color_end).count() / 1000.0f)
    //           << "us, infer: " << ((infer_end - type_end).count() / 1000.0f)
    //           << "us, decode: " << ((decode_end - infer_end).count() / 1000.0f)
    //           << "us, show: " << ((show_end - decode_end).count() / 1000.0f) << "us "
    //           << "sum: " << ((show_end - begin).count() / 1000.0f) << "us\n";

    std::cout << (1000.0f / ((show_end - begin).count() / 1000000.0f)) << "fps\n";
    return rt::Ok();
}

int main(int argc, char** argv) {
    auto res = do_main();

    if (!res.ok()) {
        std::cout << rt::toString(res.error()) << std::endl;
        return 1;
    }

    return 0;
}
Build project
cmake -B build -S .
cmake --build build --target all
Run project
build/optimium-cppThis command will display a detection result similar to the example below.
If the image window does not appear, you may have an issue with GL. In this case, modify Line #152 from imshow to imwrite so you can view the result after the termination of the project.
In this tutorial, we demonstrated how to deploy Optimium-optimized model on Raspberry Pi 5 using C++ Optimium Runtime and remote setting. The Optimium Runtime provides not only a C++ API but also Kotlin bindings. In the next tutorial, we'll explore how to use Optimium to deploy your AI model on an Android device. Check it out here: Run face detection in Android with Kotlin.
Updated 6 months ago