Run face model on Android w/ Kotlin
What we are going to do
In this tutorial, we will run a face detection AI model on an Android device using Kotlin and Android Studio under single-thread. We will optimize the AI model using the remote setting explained in the previous tutorial Set up target device in remote setting.
Requirements
- Any Android device as the target device.
- ADB connection established between the target device and the host device.
This tutorial process is composed of three steps: 1. Launch Remote Server, 2. Optimize, and 3. Deploy & test.
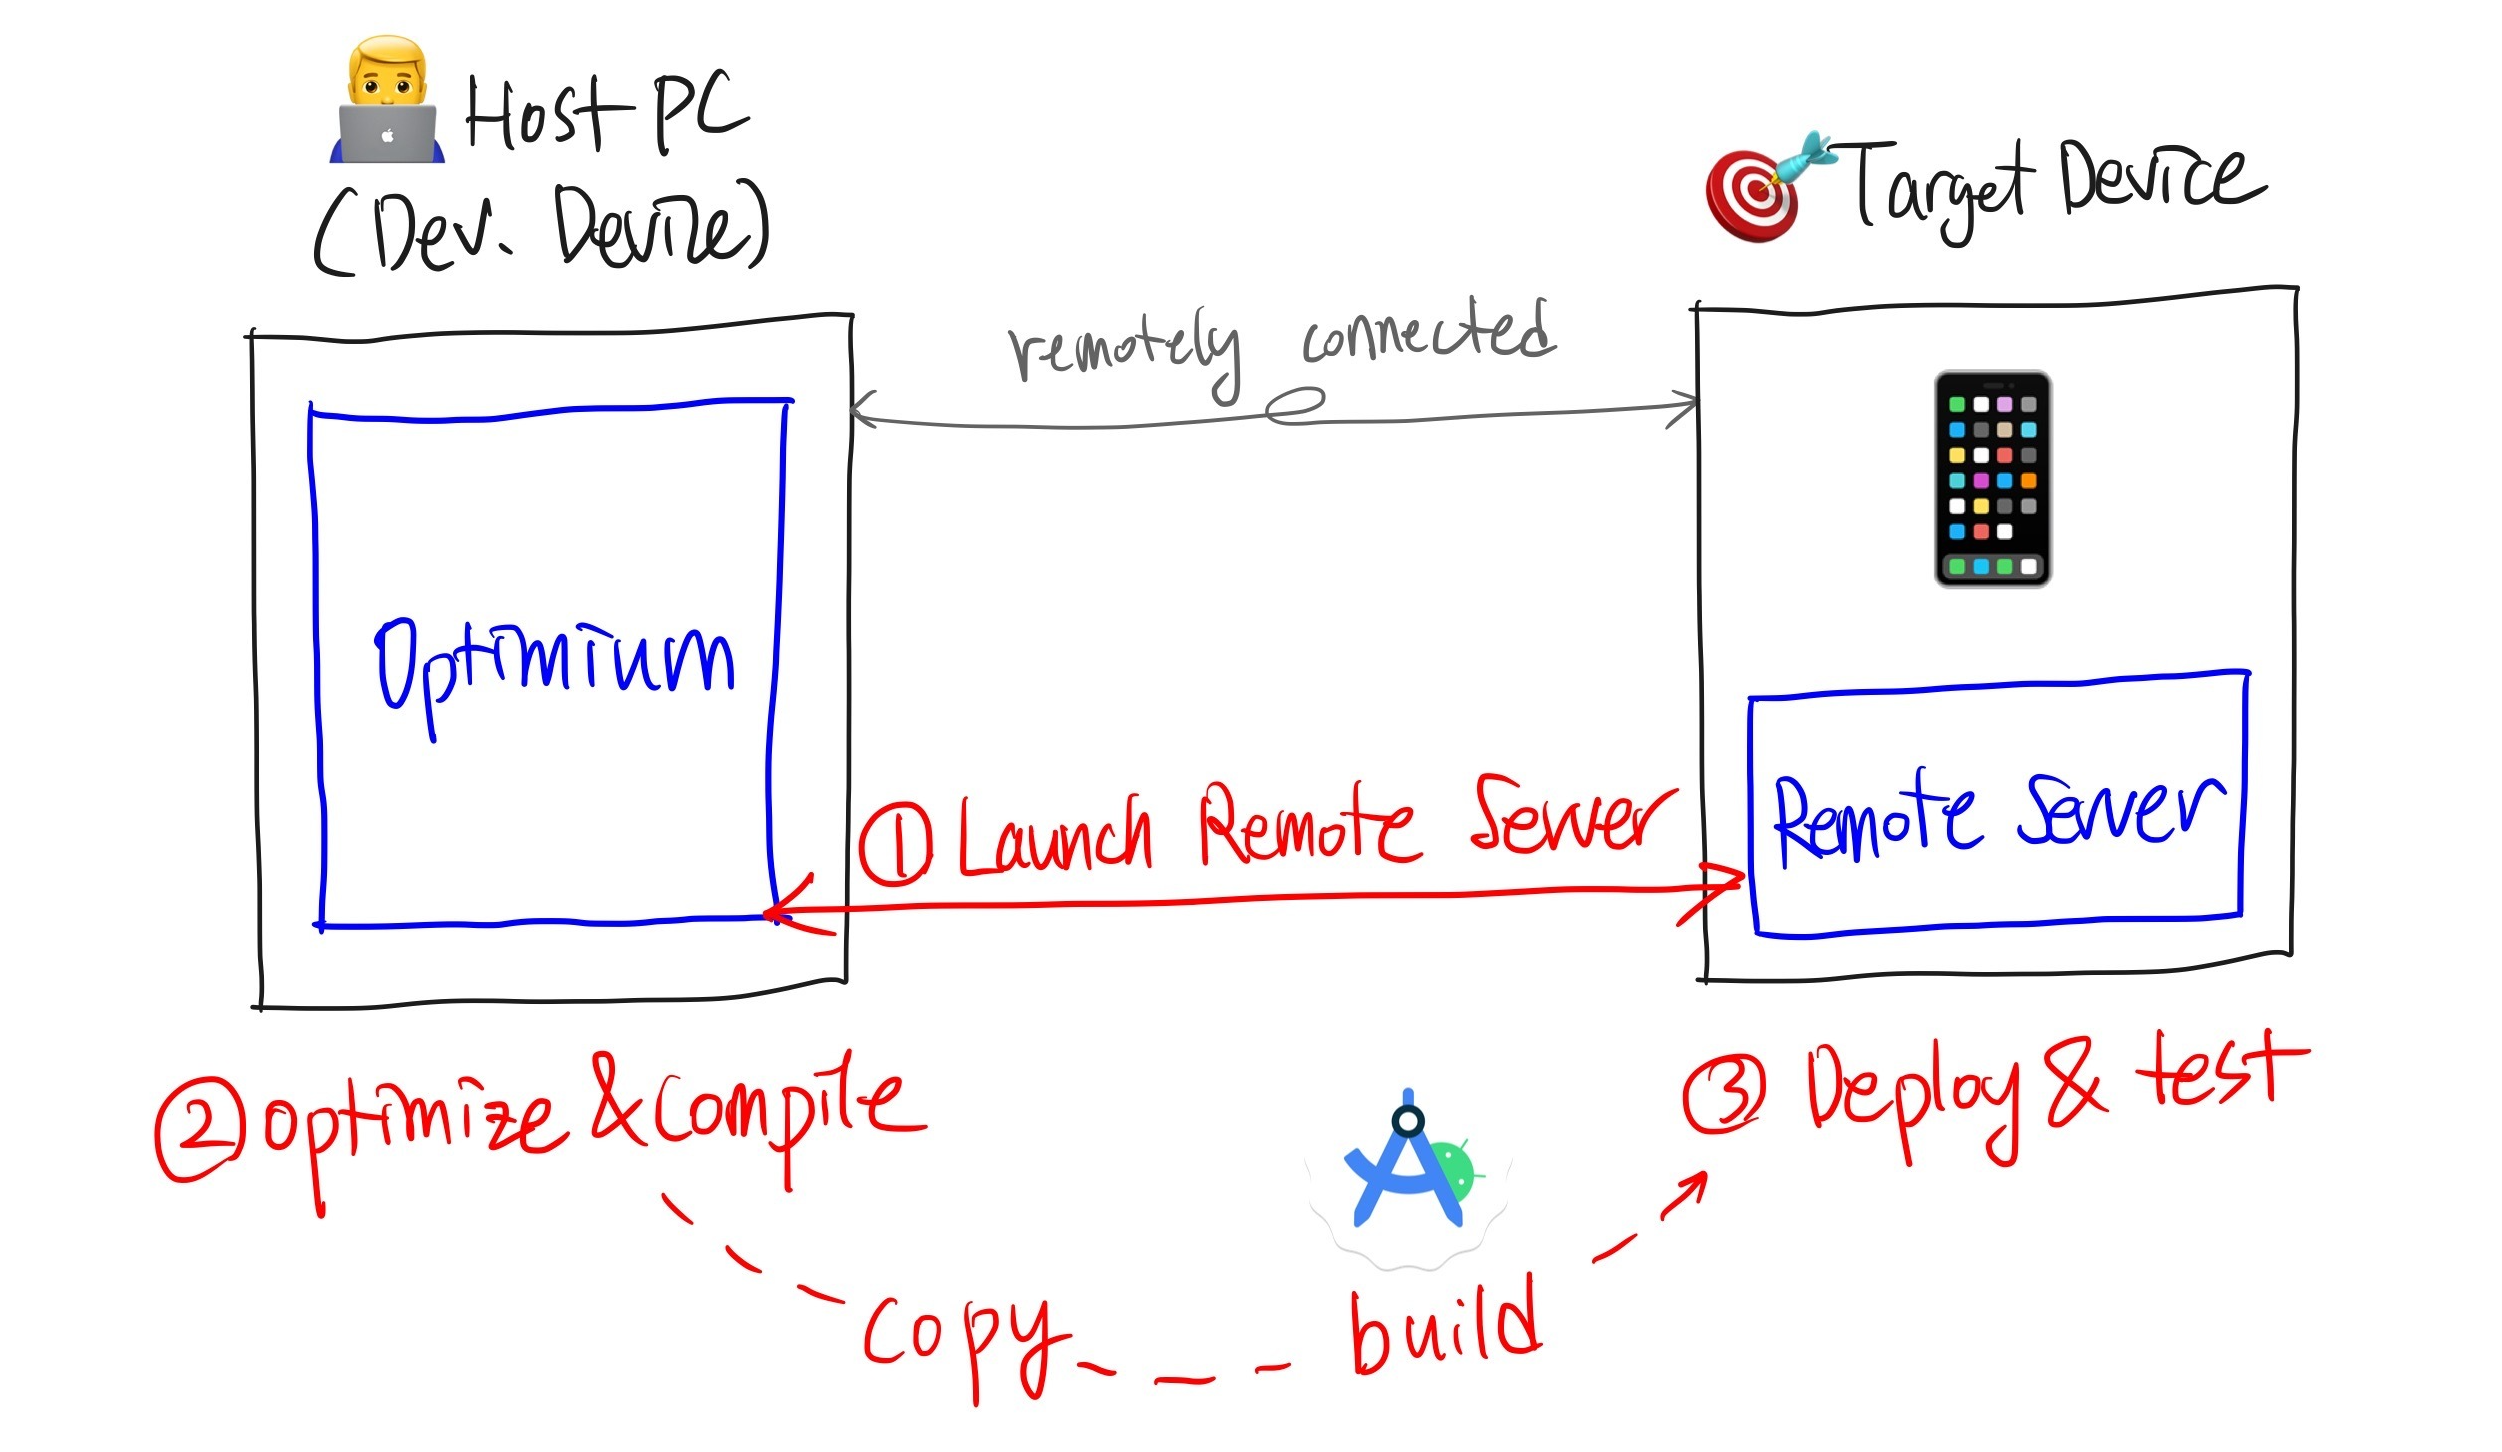
1. Launch Remote Server
We assume that you have set up the remote setting on your target device. If not, please check the previous tutorial Set up target device in remote setting.
Open terminal on your host PC and connect to the target device using Android Debug Bridge(ADB).
adb shell -S <serial number>Move to the parent folder of the path where the Optimium Remote Server is installed. If you installed the Optimium Runtime Remote as described in Set up target device in remote setting, it should be located in the default path:/data/local/tmp/.local.
# Move to /data/local/tmp, where is parent folder of /data/local/tmp/.local
cd /data/local/tmp
Configure the necessary environment variables and launch the Optimium Remote Server. The Optimium Remote Server uses port 32264 as the default listening port. You can change it by using the --port PORT option.
Make sure you remember this <port>for use in later steps.
export PATH="$PATH:/data/local/tmp/.local/bin"
optimium-remote-server --port <port number>
Port forwarding device
If your target device is connected to a network (e.g., WiFi or WLAN) and is accessible from the host device via an IP address, you can skip this step. Simply remember that IP address of the target device. If not, you should port-forward through ADB so that Optimium can communicate with the target device.
2. Optimize
Before you start
1️⃣ Download the model and image files
Prep: Download the pose detection model here, and the sample image here.
You need the TFLite model and image files. We will use the face detection model published by Google MediaPipe project. Get face_detection_short_range.tflite and sample_image.jpg and save them wherever you want.
2️⃣ Set the environmental variable
The environment variable WORKING_DIR must be set before importing Optimium.
WORKING_DIR is the path where Optimium-related logs and outputs are created.
cd <any workspace you may want>
export WORKING_DIR=$PWD
3️⃣ Create a user argument file template
To fully optimize your model for your target hardware, you need to provide hardware information.
Don't worry; you can simply follow the prompts (see detailed steps here)
First, run Python and enter the following commands:
import optimium
optimium.create_args_template()
Once you have followed all the prompted instructions, user_arguments.json will be created in your WORKING_DIR.
Note: In this guide, for better accessibility, please select the following options:
- Press "yes" when prompted with "Is your target device remotely connected?"
- Enter the
IP address of the target devicewhen prompted "Specify remote IP address of your remote device." - Enter the
port of the remote serverwhen prompted with "Specify remote port of your remote device, press ENTER to skip (default: 32264)" - Select "ARM64" when prompted "Select architecture of target device" (because most Android devices are ARM64 device, but you may change this based on your environment)
- Press "2" when prompted with "Select your framework"
- Press "yes" when prompted with "Enable hardware-specific auto-tuning?"
- Press "2" when prompted with "Select OS of target device"
4️⃣ Modify model information
Next, you need to update your model information as guided here. You should modify "model_path" and "input_shapes".
model_path: The relative path to where you savedface_detection_short_range.tflitein your workspace directory. (In fact, it is the relative path toWORKING_DIR, which was set to your workspace directory in step 2.)input_shapes: This model has one input with shape[1, 128, 128, 3]
Modify the model information ("input_shapes" and "model_path") in user_arguments.json, as below.
{
  	...
    "model": {
        "input_shapes": [
            [1, 128, 128, 3]
        ],
        "framework": "tflite",
        "tflite": {
            "fp16": false,
            "model_path": "[relative path to face_detection_short_range.tflite]"
        }
    },
    ...
}
5️⃣ Set your license key information
Optimium requires a license. If you have not received a license, please check your mail or contact us. To set the license, you can save the license key into user_arguments.json under the key "lincense_key".
# user_arguments.json
{
    "license_key": "AAAAA-BBBBB-CCCCC-DDDDD",
    "device_name": "MyDevice",
    "model": {
 				...
		},
 		...
}
Run Optimium
In your workspace, run python3 and execute the following lines. This step optimizes and compiles the provided model.
import optimium

optimium.optimize_tflite_model(max_trials=128)Optimium dynamically searches and tunes inference performance to fit the target hardware. This process may take a considerable time depending on your machine. We are actively working to accelerate the process!
Setting a lower value for
max_trialsmay help you get the result faster, but it might not fully optimize the model. For this example,max_trials=128will be enough.
Check output
The above step saves the result in $WORKING_DIR/outputs/. The nested directory name depends on "device_name", "opt_log_key", and "out_dirname" in user_arguments.json.
You should get two files like the example below:

3. Deploy & test
It's quite a long code, so for the sake of this tutorial we provide an Android project via Github here
Install Runtime
Make sure that you have downloaded the Optimium SDK (see Optimium Setup). There's a directory named runtime/kotlin inside.
1️⃣ Add local Maven repository to your settings.gradle (or settings.gradle.kts) file.
settings.gradle (or settings.gradle.kts) file.// Write path to Optimium SDK path or
// use System.getenv("OPTIMIUM_SDK_ROOT")
def OPTIMIUM_SDK_ROOT = "..."
dependencyResolutionManagement {
repositories {
// ... other repositories
maven {
name "Optimium"
url "${OPTIMIUM_SDK_ROOT}/runtime/kotlin"
}
}
}// Write path to Optimium SDK path or
// use System.getenv("OPTIMIUM_SDK_ROOT")
val OPTIMIUM_SDK_ROOT = "..."
dependencyResolutionManagement {
repositories {
// ... other repositories
maven {
name = "Optimium"
url = uri("${OPTIMIUM_SDK_ROOT}/runtime/kotlin")
}
}
}2️⃣ Add dependency for Optimium Runtime to your project.
dependencies {
    def OPTIMIUM_RUNTIME_VERSION = "0.3.2"

    // For JVM platform
    implementation "com.enerzai.optimium.runtime:jvm:${OPTIMIUM_RUNTIME_VERSION}"
    runtimeOnly "com.enerzai.optimium.runtime:jvm:${OPTIMIUM_RUNTIME_VERSION}:x64-linux"

    // Native extension
    runtimeOnly "com.enerzai.optimium.runtime:jvm-native:${OPTIMIUM_RUNTIME_VERSION}:x64-linux"

    // XNNPack extension
    runtimeOnly "com.enerzai.optimium.runtime:jvm-xnnpack:${OPTIMIUM_RUNTIME_VERSION}:x64-linux"


    // For Android platform
    implementation "com.enerzai.optimium.runtime:android:${OPTIMIUM_RUNTIME_VERSION}"

    // Native extension
    runtimeOnly "com.enerzai.optimium.runtime:android-native:${OPTIMIUM_RUNTIME_VERSION}"

    // XNNPack extension
    runtimeOnly "com.enerzai.optimium.runtime:android-xnnpack:${OPTIMIUM_RUNTIME_VERSION}"
}
dependencies {
val OPTIMIUM_RUNTIME_VERSION = "0.3.2"
// For JVM platform
implementation("com.enerzai.optimium.runtime:jvm:${OPTIMIUM_RUNTIME_VERSION}")
runtimeOnly("com.enerzai.optimium.runtime:jvm:${OPTIMIUM_RUNTIME_VERSION}:x64-linux")
// Native extension
runtimeOnly("com.enerzai.optimium.runtime:jvm-native:${OPTIMIUM_RUNTIME_VERSION}:x64-linux")
// XNNPack extension
runtimeOnly("com.enerzai.optimium.runtime:jvm-xnnpack:${OPTIMIUM_RUNTIME_VERSION}:x64-linux")
// For Android platform
implementation("com.enerzai.optimium.runtime:android:${OPTIMIUM_RUNTIME_VERSION}")
// Native extension
runtimeOnly("com.enerzai.optimium.runtime:android-native:${OPTIMIUM_RUNTIME_VERSION}")
// XNNPack extension
runtimeOnly("com.enerzai.optimium.runtime:android-xnnpack:${OPTIMIUM_RUNTIME_VERSION}")
}Copy the output into project
Copy the optimized model folder into the src/main/assets directory of the Android project. The optimized model is located in $WORKING_DIR/outputs as described earlier. Ensure you copy the entire folder (e.g., MyOutputDir in above example) into the project directory.
Build your project
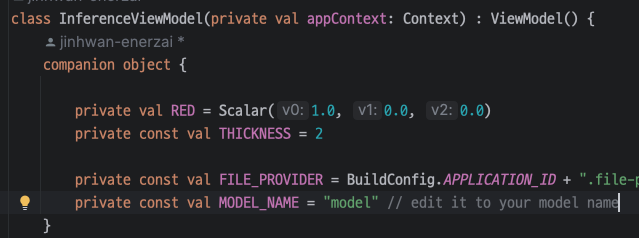
Open the Android project in Android Studio. Navigate to the file src/main/com/enerzai/optimium/example/android/InferenceViewModel.kt and update the model name to match your optimized model's location.
Build the project in Android Studio. Once the build is complete, the application will automatically deploy and run on the connected Android device.
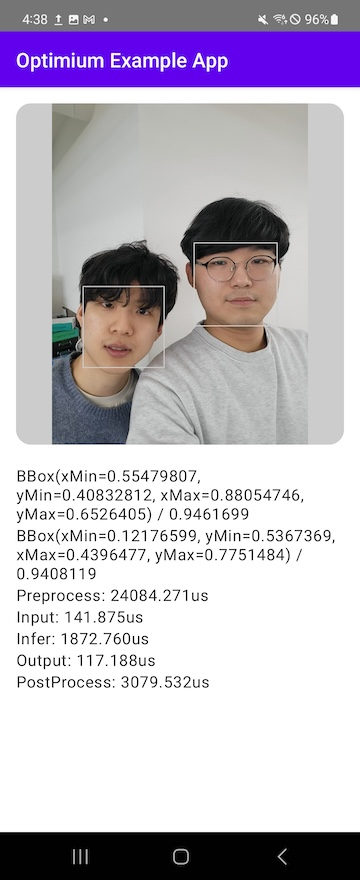
You should see a scene similar to the example below:
Updated 6 months ago